
All guides
ZMK: remap with Keymap Editor and GitHub
Fork the config repo, edit visually, let GitHub build the firmware, then flash it. Works for every ZMK keyboard.
Last updated 2026-10-15
This is ZMK's universal remapping route: your keymap lives in a .keymap file in your own GitHub repository, GitHub builds the firmware, and you flash it. It unlocks every ZMK feature (combos, macros, home row mods…) and works on keyboards without ZMK Studio.
The whole flow:
Fork config repo → edit in Keymap Editor → Commit → GitHub Actions builds → download firmware.zip → flash
You'll need
- ✅ A GitHub account
- ✅ The zmk-config repository from your keyboard's maker
- ✅ A data-capable USB cable
Step 1: fork the config repo
- Open the maker's config repository and click Fork to copy it to your account.
- In your fork, open the Actions tab and enable workflows if asked.
Step 2: edit with Keymap Editor
- Open Keymap Editor and sign in with GitHub.
- Choose your fork and branch; the layout loads automatically.
- Pick a layer and click the position to change.
- Choose a behavior (
&kpkey press,&momomentary layer,<layer-tap,&mtmod-tap) and its parameters. - Click Save, then Commit to push the change to GitHub.

Or edit the .keymap file directly
Once comfortable, editing .keymap on GitHub is quick. A minimal example:
/ {
keymap {
compatible = "zmk,keymap";
default_layer {
bindings = <
&kp Q &kp W &kp E
&mo 1 &kp A < 1 SPACE
>;
};
number_layer {
bindings = <
&kp N1 &kp N2 &kp N3
&trans &kp N4 &kp N5
>;
};
};
};
Layers are numbered from 0 in the order they appear. Syntax cheat sheet: Layers, keycodes and behaviors.
Step 3: download the firmware
- After committing, open the Actions tab and wait for the latest build to turn green ✅.
- Open the run and download
firmware.zipunder Artifacts; unzip it.

Step 4: flash
- Put the keyboard in bootloader mode — usually double-tap the reset button, or press a key bound to
&bootloader. - A USB drive appears (e.g.
NICENANO). - Drag the matching
.uf2file onto it; the keyboard restarts when the copy finishes.
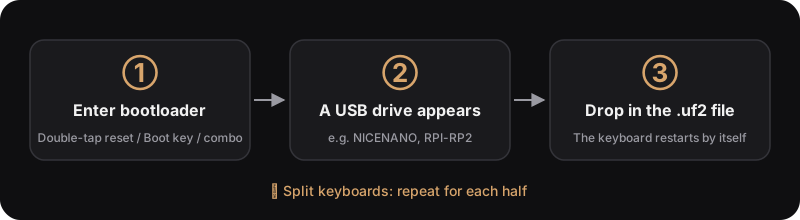
Details: Flash firmware.
Common problems
- The Actions build failed (red ❌): open the failed run to read the error — usually a
.keymapsyntax mistake. Revert your last change and commit again. - No layout in Keymap Editor: make sure you picked your own fork, and it still has the maker's
build.yamland keymap files. - Keys wrong after flashing: re-enter the bootloader and flash your last known-good firmware.
More → Troubleshooting